Working With Supabase Using Autogenerated APIs
Introduction
Software engineering utopia is a real thing. Developers across the world debate openly about working with the best tools. More importantly, they dream about holistic API documentation that will boost their integration and build speed, as well as simplify the complex projects they have to build and contribute to every other day.
The significance of a well-written API documentation cannot be overemphasized and Supabase - the Firebase alternative, providing backend-as-a-service is contributing to this by the auto-generation of APIs and consequently documentation.
In addition to being open-sourced(which means it can be self-hosted or deployed as a managed service), Supabase offers features such as Postgres database, Authentication, Edge functions, Realtime Subscriptions, and Storage, thereby bringing to the fore, the important combination of powerful back end services and easy to use client-side libraries and SDKs for an end-to-end tech solutions.
In this article, you will learn about Supabase's autogenerated APIs, set up your own Supabase studio and then implement your learning by creating a basic interactive application.
Let's get started...
Table Of Content
- Setting Up Supabase Studio
- Autogenerated APIs
- Setting Up Your React Application
- Building The Memoir Application
- Conclusion
Setting Up Supabase Studio
Go to Supabase.io and click "Start your project" to create a new account or open an existing account. You can authenticate your account with whichever service you prefer. [show image]

After authentication, click "New Project" and create a new project under your preferred chosen organization. [show image]

Once your project has been successfully set up, navigate to Database on the left hand menu and create a new table. [show image]

Supabase offers a hosted, dedicated PostgreSQL database. Pro experience or prior expert SQL/database knowledge is not needed, to understand and manipulate the tables. Supabase Studio comes with a table view which is a user interface for accessing and viewing the tables. Using the table view is as easy as working with a spreadsheet.
Create a table for the memoirs blog by clicking the "Table Editor". You will be given a primary key and your table should look like the one below upon successful creation.
Open the table editor and add two columns
titleandcontent. Both should have typetext.
This is where it gets interesting. Supabase will auto-generate an API documentation along with secure, fast API configuration whenever you create or update your table schema. Cool right?
Autogenerated APIs
Let's take a pause for a minute and dwell more on the autogenerated APIs.
The autogenerated APIs provide access to three types of APIs directly from your database schema: REST, Realtime, and GraphQL.
The Supabase REST API will interact with your database through a restful interface using PostgREST, and can performs everything ypu require from a CRUD API. The REST API also works with the Postgres security model - including Row Level Security, Roles, and Grants.
The GraphQL API will interact through a graphQL interface and the Realtime API will listen to database changes over websockets.
Row Level Security allows you to restrict access to your database tables and prevents malicious actors from manipulating your table if they are not assigned the specified role to do so. You can refer to the official Supabase docs to learn more about Row level security.
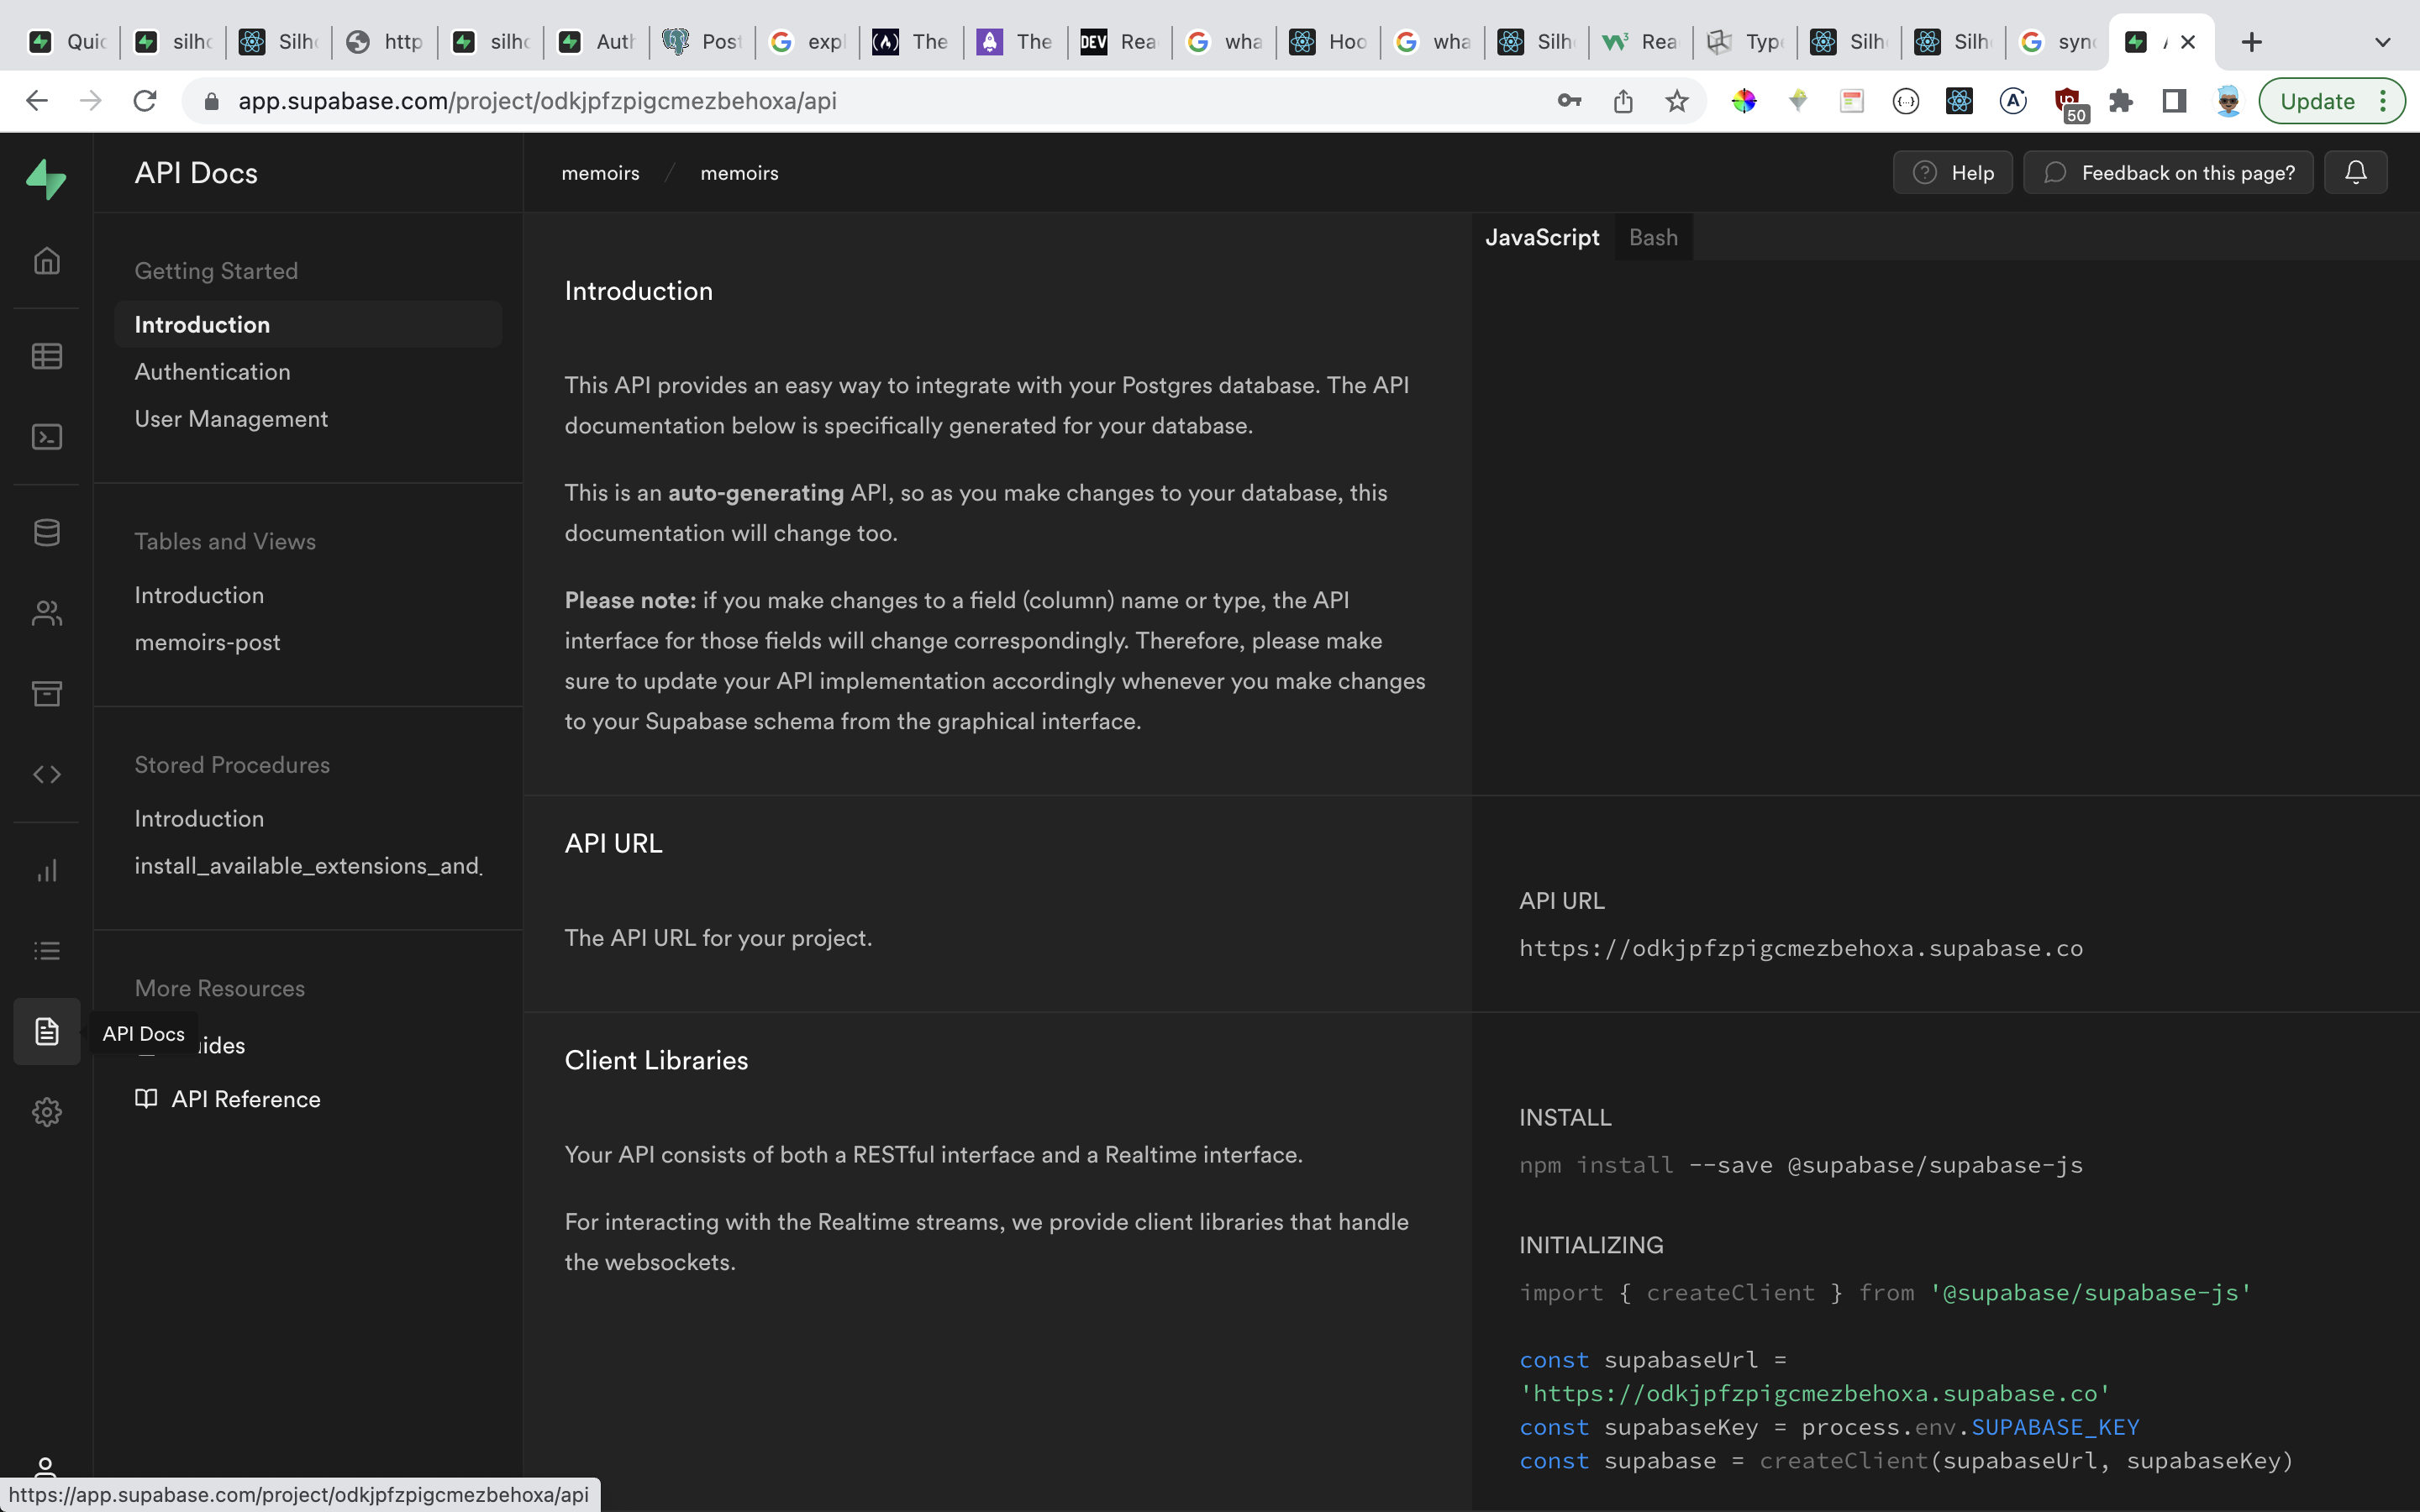
For our project, You can view the auto-generated API documents by going to the API section from the left side menu
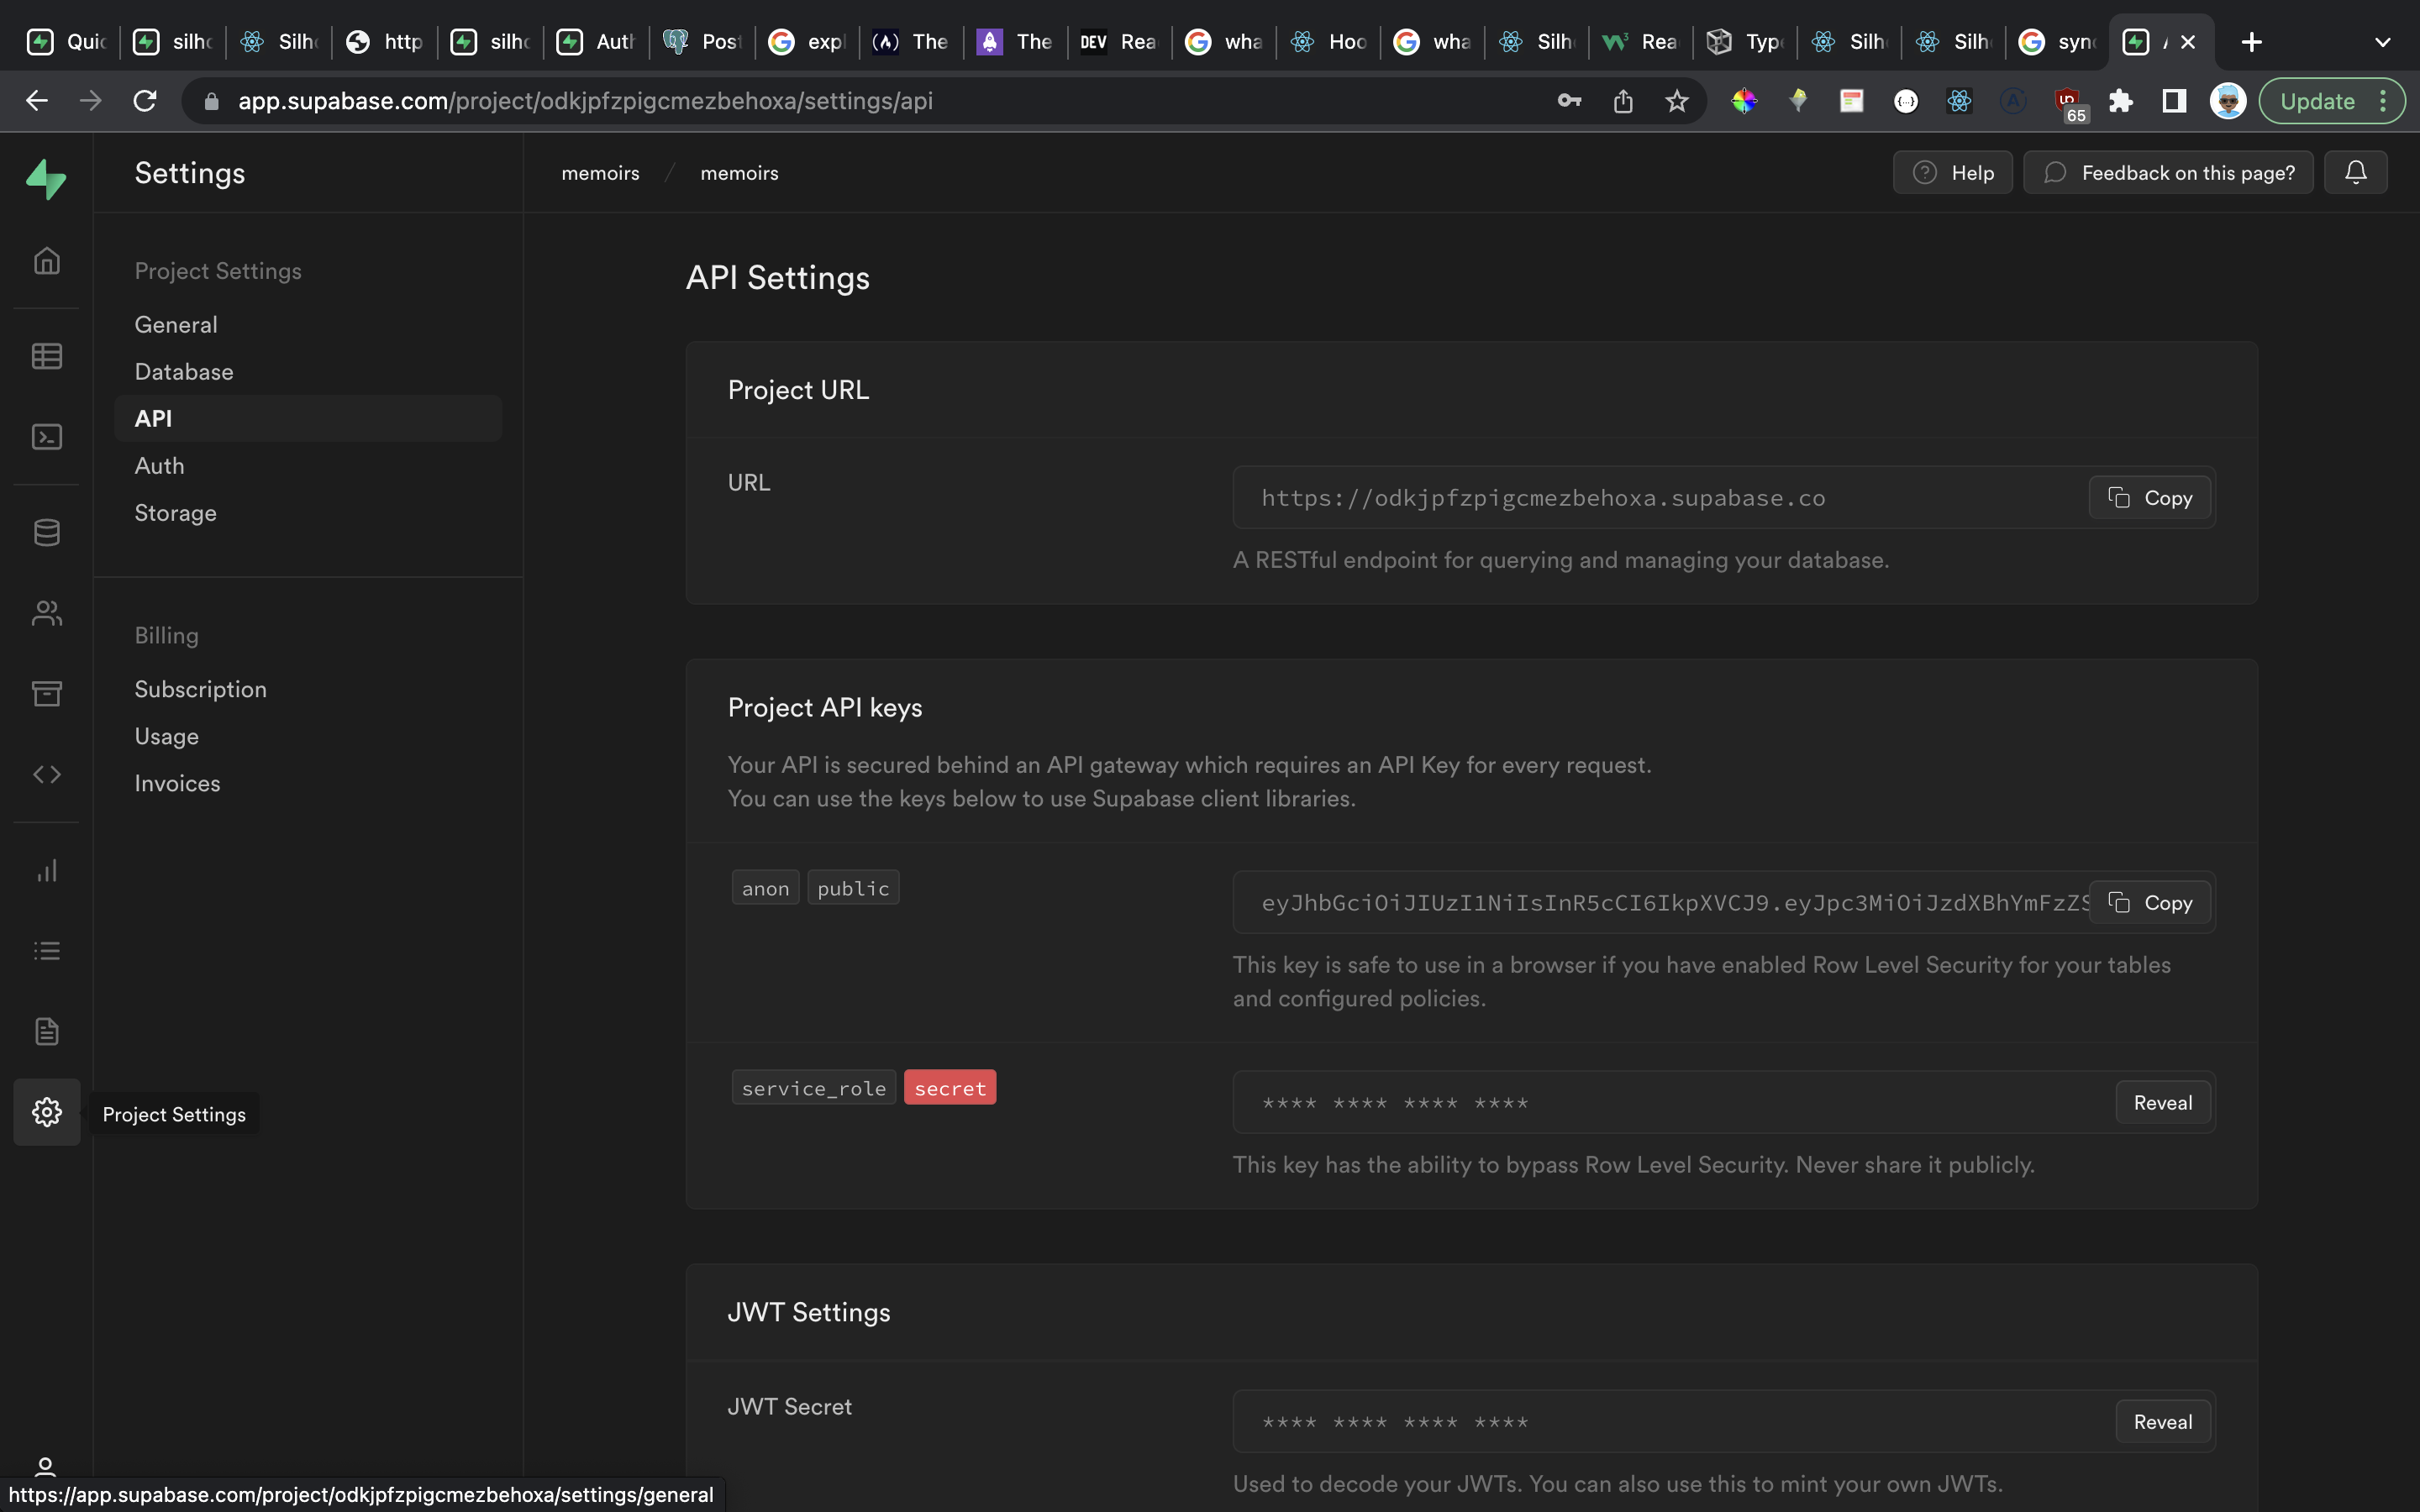
You can also get your API URL and API keys by navigating to
Settingsand clicking onAPI
While on the API Docs page, the right hand side shows how you can connect to your Supabase project from within Node.js applications using the createClient class from the supabase-js npm package

The autogenerated API also makes provision for code snippets for the many operations that can be performed in the project from filtering and updating, to subscribing to real time changes.
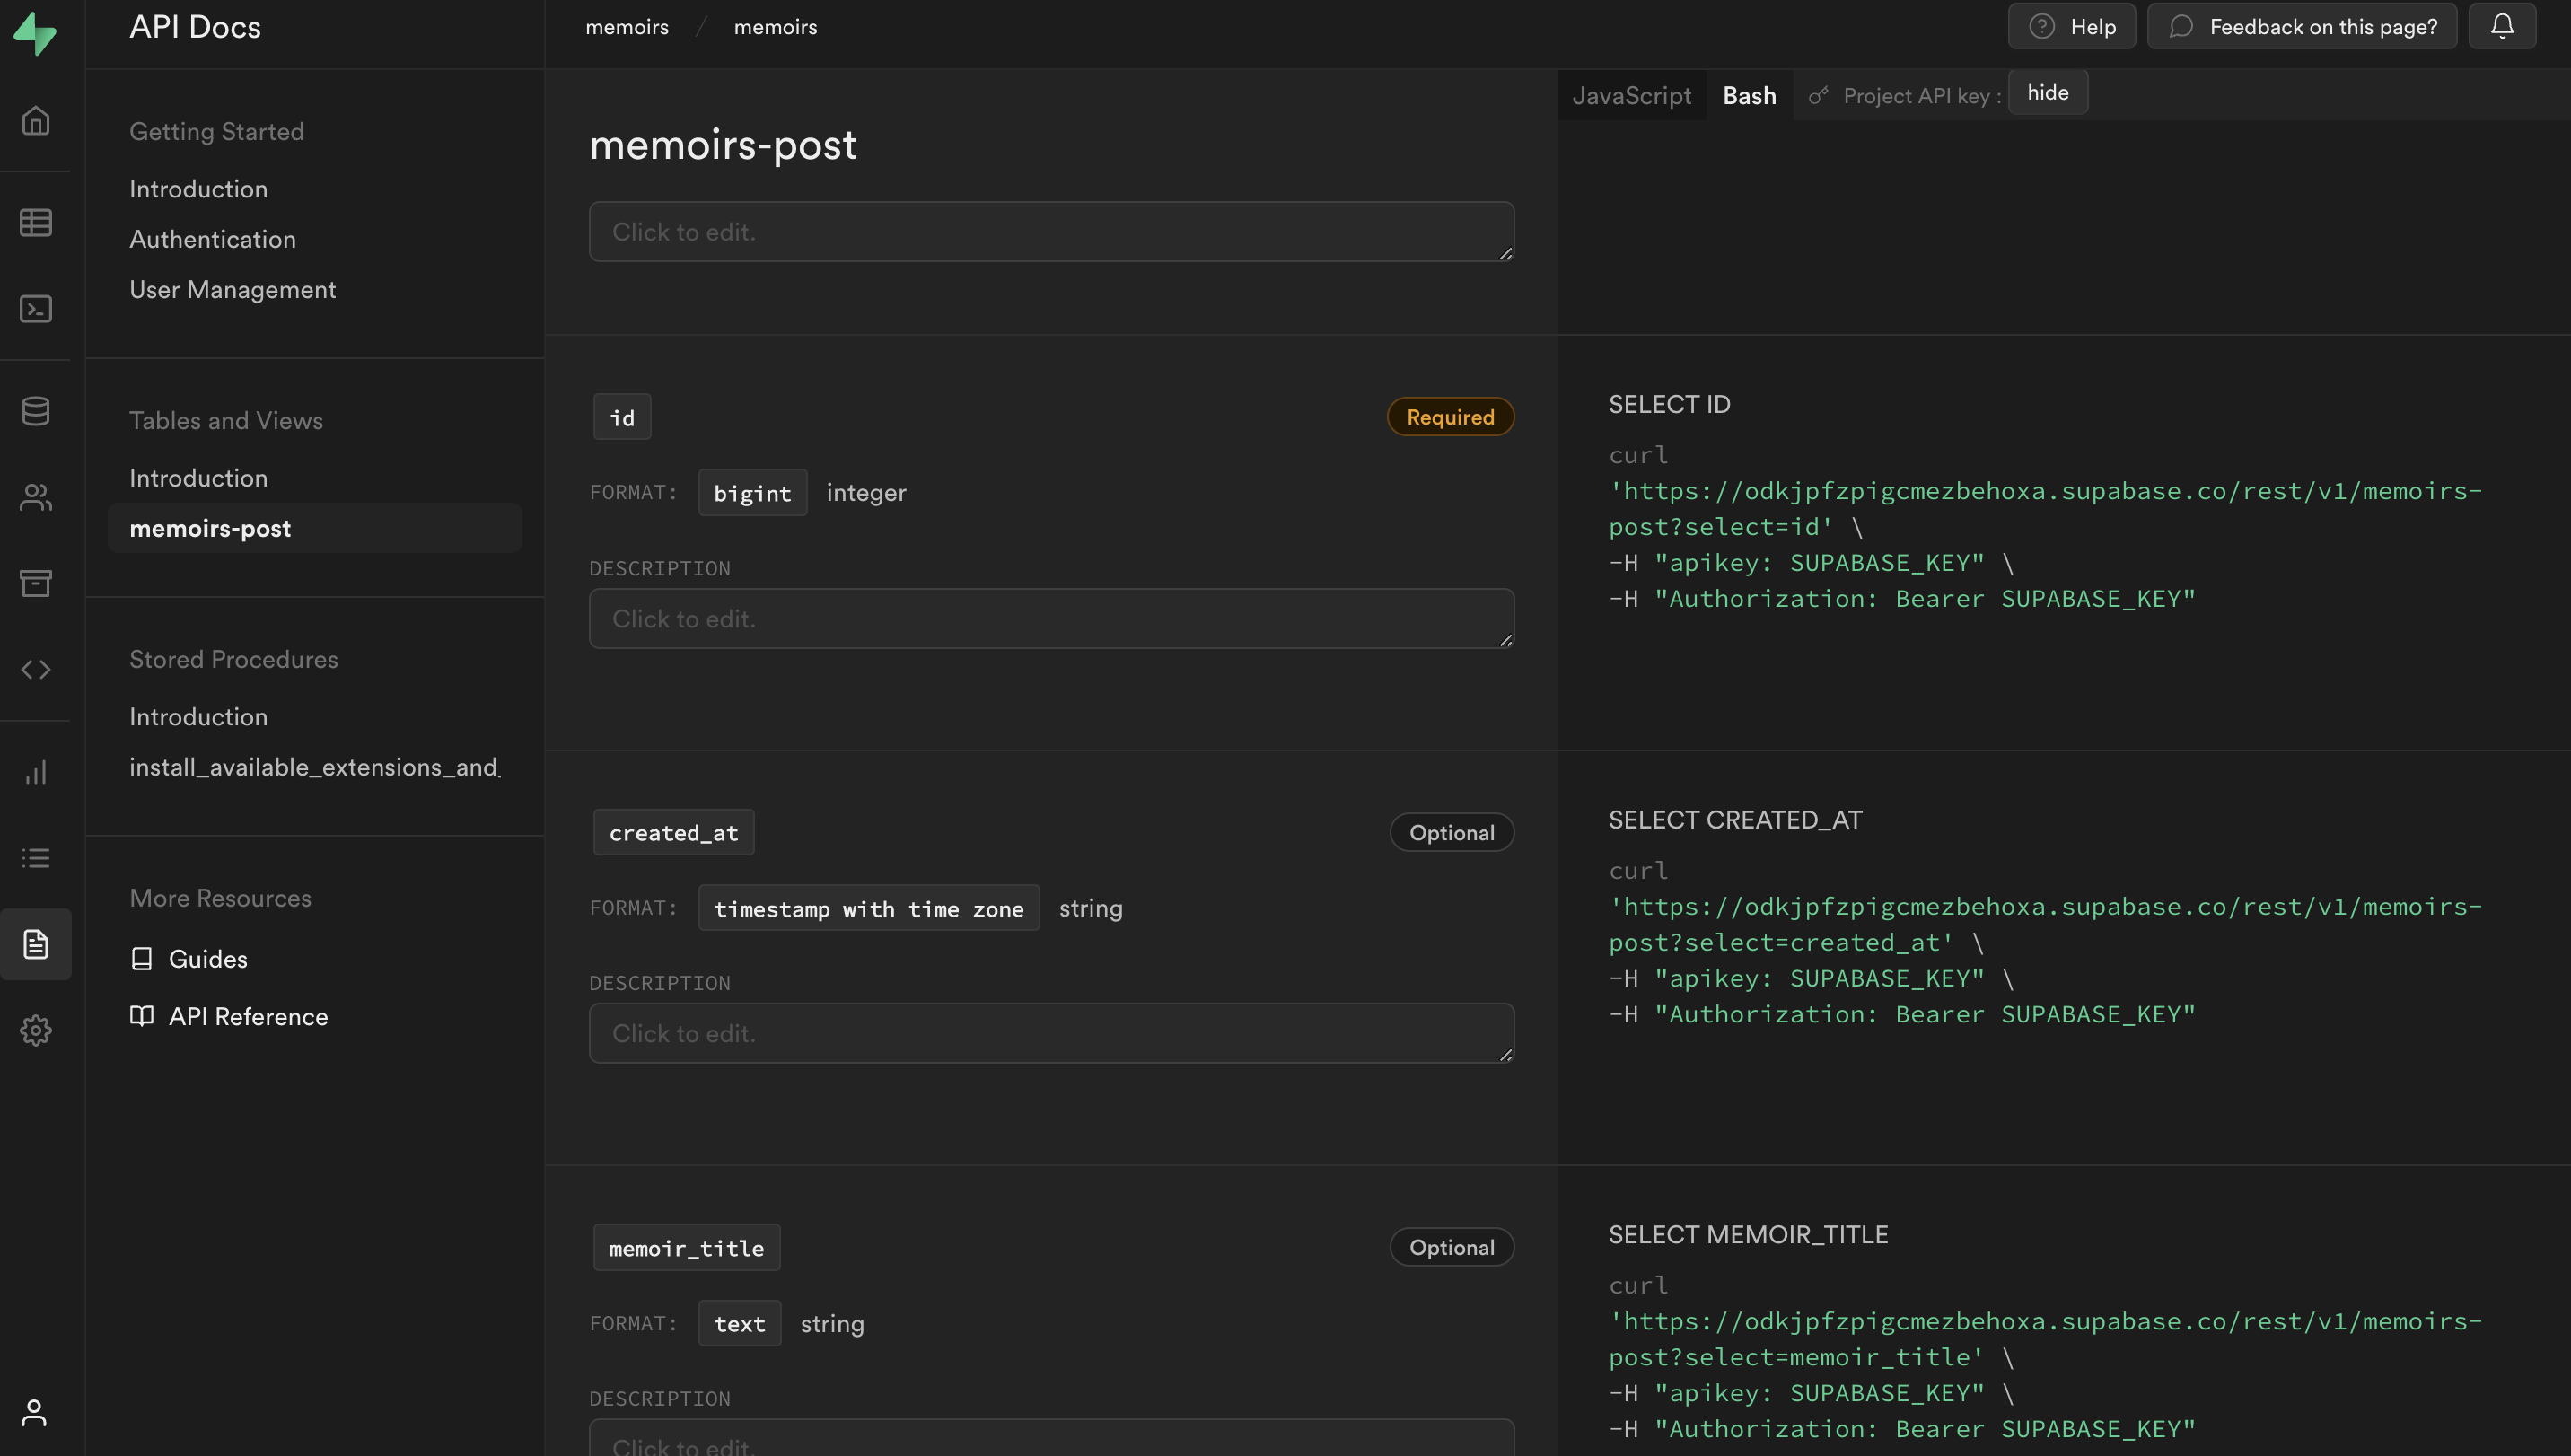
The schema definition displays as soon as a table is selected for view. Additional descriptions can also be made to your table fields to improve the documentation even more.
Supabase also auto-generates CURL requests for CRUD operations to run against your tables. This gives users a way to quickly interact with their tables if you're using the Linux command line.

Let's get back to building our simple interactive project now that we have our database ready to use and have learned about the Supabase autogenerated APIs.
Setting Up Your React Application
- Create a new React application in your terminal by using the
npx create-react-appcommand.
npx create-react-app memoir[show image]
- Navigate to the
memoirdirectory and install supabase.
cd memoir/
npm install --save @supabase/supabase-js
Building The Memoir Application
Create a
client.jsfile in thesrcfolder. This will be responsible for interacting with the supabase backend.Import
createClientfrom supabase and add the following code
import { createClient } from "@supabase/supabase-js";

export const supabase = createClient(
    <your API url>,
    "your API key"
)
In the above, the supabase variable is exported and it calls createClient while passing in the supabase memoir app url and the API key. API key can be gotten from navigating to Settings from your supabase studio.
Open
src/App.jsand remove all the boilerplate code.To manage the local state and handle lifecycle methods, import
useStateanduseEffectfromReact.
import { useState, useEffect } from 'react';- Next, import the supabase client created earlier.
import { supabase } from './client';- Create a state variable that handles the memoirs returned from the supabase API.
    //...
const [posts, setPosts] = useState([])- Then create a singular memoir post variable that allows the user to store their memoir titles and content as they type.
    //...
const [post, setPost] = useState({ title: "", content: "" })- Next, destructure the
titleandcontentso they can be used more easily and then create a functionfetchPoststhat calls supabase, passes in the table name and then selects every memoir from the table.setPostswill then set the memoirs array with the data returned from supabase.
//...
const { title, content } = post

  async function fetchPosts() {
    const { data } = await supabase
      .from('posts')
      .select()
    setPosts(data)
    console.log("data: ", data)
}- call the
fetchMemoirsfunction when the application loads withuseEffect
    //...
  const { title, content } = post

  useEffect(() => {
    fetchPosts()
  }, [])

  async function fetchPosts() {
    //...
}createPostwill allow you call the supabase API to insert an individual memoir input by the user
async function createPost() {
    await supabase
      .from('posts')
      .insert([
        { title, content }
      ])
      .single()
    setPost({ title: "", content: "" })
    fetchPosts()
}setPostwill reset the form field once the memoir is created andfetchPostto update the UI with the new posts.
 setPost({ title: "", content: "" })
    fetchPosts()
Your code should look like this now...
import './App.css';
import { useState, useEffect } from 'react';
import { supabase } from './client';


function App() {
  const [posts, setPosts] = useState([])
  const [post, setPost] = useState({ title: "", content: "" })
  const { title, content } = post

  useEffect(() => {
    fetchPosts()
  }, [])

  async function fetchPosts() {
    const { data } = await supabase
      .from('posts')
      .select()
    setPosts(data)
    console.log("data: ", data)
  }

  async function createPost() {
    await supabase
      .from('posts')
      .insert([
        { title, content }
      ])
      .single()
    setPost({ title: "", content: "" })
    fetchPosts()
}- For the UI, insert the following code in the return...
return (
    <div className="App">
      <input
        placeholder='Memoir Title'
        value={title}
        onChange={e => setPost({ ...post, title: e.target.value })}
      />
      <input
        placeholder='Memoir Content'
        value={content}
        onChange={e => setPost({ ...post, content: e.target.value })}
      />
      <button onClick={createPost}>Create Memoir</button>
      {
        posts.map(post => (
          <div key={post.id}>
            <h3>{post.title}</h3>
            <p>{post.content}</p>
          </div>
        ))
      }
    </div>
  );
The above will set the placeholder and value to title and the onChange handler to set the title value as the user types. The same is done for the content.
A button with an
onClickhandler is created andcreatePostattached to it and the memoirs are mapped to display them in the UIRun
npm startto view the UI and memoirs can be created and viewed in the project.When the app is refreshed, the memoirs are fetched by the APIs at the supabase backend as expected.
Conclusion
Supabase is a tool that recognizes the importance of managing your backend services without too much stress. Emphasis cannot be placed enough on the benefits of creating good API documentation too. Supabase also shows that creating production-grade, scalable applications complete with security features such as user authentication and management for securing and accessing user data is possible in faster time.
You can take a peek into the Supabase blog or refer to their official technical documentation for the latest information on Supabase releases and updates.